Project: Alien Autopsy

mattym

Weaksauce
Joined
Dec 21, 2007
Messages
94
Project: Alien Autopsy

So after reading these forums for several years and only recently starting to post i have decided to rebuild my old PC and do some case modding in the process.

I have an old Alienware, i got it around the 2001 holiday season. I have had wraped up and tucked away in my basement for about 2 years now. I thought it was about time i cut it open and poked around a bit.

The Plan: is to replace all the hardware. I will probably be keaping the Sound Blaster Audigy 5.1 card it had. Seing as i have a nice 5.1 surround pc system i dont see the need to upgrade the card. Most of the time i just use headsets anyway. I will also be cutting in a case window to pear in at all the nice new organs. The case which is Alienware's signature saucer silver will remain that way exept for the inside. Thats gonna get a nice fluorescent green coat.

So here is what im working with:

Pulling it out of storage.
storagewn7.jpg


Side open to view the old parts.
insidenr3.jpg


Side Panel:
sideau8.jpg

Red area is were i want to do the window. I may extend it into the blue area if the inside color comes out nice on the drive bays. Lastly the fan grill will be placed on the new clear side panel.

Parts:
(Arrive Tommorow 5/2)
ASUS P5N-D LGA 775 NVIDIA nForce 750i SLI
GeForce 9600GT Superclocked 512MB 256-bit GDDR3 PCI Express 2.0 x16
C Power & Cooling S75QB EPS12V 750W Power Supply
Intel Core 2 Duo E8400 Wolfdale 3.0GHz
CORSAIR XMS2 2GB (2 x 1GB) 240-Pin DDR2 SDRAM DDR2 800
Western Digital Caviar SE16 WD5000AAKS 500GB 7200 RPM 16MB Cache

As far as interior lighting goes i am still unsure of what i want. One of the paints im looking into has a glow effect under UV so i may get that or a plain white(A green light may clash). I had planned to use a green tinted plexi for the side pannel but it seemed redundant so i will go with clear to ge the full effect of the paint job.

Right now the case has all the interior parts removed and is ready to be measured and prepped for the new parts and painting. I will be building the new PC into the case prior to painting so that i may test all the hardware as well as see if i need to cut anything from the case before I do the paint job.
Picks of the dissasembly are still on my camera, ill try and get em up tonight.
Let me know what you think.
 
And to think the parts you just purchased are at a fraction of the cost you initially paid for it... right?

Should be quite a bit you can do with the old school Alienware.
 
Oh Yeah, the bill was for about $870, plus i have $60 worth of rabates on the stuff. So in the end about $820 after shipping. Compared to the ~$2200 i origionaly payed for the Alienware. Cant wait to get the new system fired up.
 
I had some time off the other day so i thought it would be the perfect time for me to take the old guts out of the PC. Took me about 3 hours total. I also cleaned everything while taking it apart and bagged and labeled all the parts and hardware.

As promised here are the pics:

God it is a nice case.
sidea.jpg


front2.jpg


Old school AGP Radeon 9700pro made by Hercules.
card.jpg


Some other PCI addons i had in there.
parts.jpg

Most parts out and front panel off.
third.jpg

close.jpg


Old model case fans.
panelopen.jpg


Emptiness!!
frontbare.jpg

bare.jpg


New Parts should be in tomorow.
 
I've torn apart a few of those Chieftech style cases and I always wondered: why are the drive cages and fans not centered on the front panel?
 
My only guess would be, sing as i had that door, they made sure to fit the drive bays and power switches all in that one area.
 
You cannot use the name Autopsy ;) I own it.


j/k . . .I have some Alienware modding experience so let me know if you need suggestions . . .I have some kick arse ideas for your mod! Google DarthBeavis if you want to know I am not teh newest n00b first ;)
 
Toss out any ideas you have, no major work has been started so i can always add something if i like it.
 
I hope this will turn out nice because I've got the same case, but made by Network (also a Chieftec Dragon copy), and I've been thinking of modding it. Good look and have fun!
 
Just a quick update. I have parts, its put together and running a ok right now. I'll post some picks once I have time. I'm putting windows xp on right now. So I hope to have an update by tomorow. I will also be going paint shopping tomorow.
 
Well I had a few driver issues, but evrything is running smooth now.
The system is running great. So, come the end of the week when I have some time free
in gonna tear it all out again and start painting. I'll post some picks of the current build later tonight.
 
Sorry for the lack of updating. I have been dealing with a stomach virus / possible food poisoning. Getting up and about just throws my stomach out of whack. Ill get some new info up once i feel better.
 
Been a long time since i updated this. But i have made a lot of forward progress on the case.

After being sick then dealing with work and the end of the semester at school i have had very little time.

Then I had to start using the new PC as my main one due to some problems with my lap top. Followed up by a heat wave in my area that made working on it impossible without passing out.

If that wasnt bad enough i had misplaced my camera. Anyway all that aside.

The case is cut, painted, trimmed, and has parts in it once again. I still have to take care of the clear side panel and buy 2 or 3 new fans.

Gonna put picks of the process up to now on the site later tonight. And hopefully get onto Illustrator to get my panel design drawn out. Should be finished soon.
 
Can't wait to see this (and hear how the parts went in...) as I have the same case and may give it a whirl...
 
i have an alienware as old as this, just before thy went to 478 socket and this custom face plate.
 
I've torn apart a few of those Chieftech style cases and I always wondered: why are the drive cages and fans not centered on the front panel?

Looks to me like it supports server-style motherboards... ones that are very long front to back. If you look at where a regular ATX motherboard would end, there's standoff holes going another 4" forward, behind where the HD bays are.
 
those case do in fact server sized boards. some of them (I know my antec did) came with a card support for full length cards. I of coarse junked it. case has alot of potential. modded mine for water cooling a old tbird. (rip)
 
I hate to sound like a broken record but i am still working on this project. Its is far from dead. Thought i would give a littel bump for all of those that were following this one.

The PC is working and very fine at that. I have just been lazy and havent taken the time to keep this log up to date. The case modding itself is done. I just need to order the plexiglass for the side. I made use of the my colleges computers and teh adobe illustrator. I have the diagram of my plexiglass panel all made up and ready to be cut. I just need to take the time and email it to the place. I printed and cut the diagram for accuracy and after a few changes and very happy with it. I just have to shell out that cash and get it cut.

After that just needs some green led fans (which are a bitch to find in stores offline btw!) and a good clean down.

Pics sometime this week(i hope).

Looks to me like it supports server-style motherboards... ones that are very long front to back. If you look at where a regular ATX motherboard would end, there's standoff holes going another 4" forward, behind where the HD bays are.

This model was actually a HiveMind system. Which i believe Alienware actually marketed as a home server PC origionaly. The line was killed almost a few months after i origionaly baught the PC. So it is likely that the Mobo tray was cut and tapped for extended and server mother boards.
 
So after months of sitting on my but and misplacing my camera. I finally got around to updating this. A lot of steps in the build process were sadly not photographed. And some of these photos are a lie. I took some recently but will put them earlier in the post because the PC looks in them as it did earlier in the build process.

So here are some pics of the parts. They were originally taken to show some box damage during shipping. Everything worked fine tho.
p1010013mm0.jpg

p1010011fi9.jpg


And the graphics card out of the box.

p1010038op6.jpg


Here is everything all in the case. I did this to make sure everything fit and worked.

p1010014ok6.jpg


Then once again stripped down. Tapped off and ready to be painted.
p1010016fd4.jpg


A few random parts with a coat of primer on.
p1010017cc2.jpg


Now the rest of the painting process took about 3 days, allowing for drying and what not.
I was not 100% satisfied with the end color but it will do. The later picks actually make the color look a lot nicer then it is.
Here is what i did while the paint dried.
p1010019ie2.jpg

Side panel all tapped up and marked off. Its hard to see but there was a lot of planning that when into the cuts.
Now i dont have pics but the whole cutting process was a pain. Never again will i cut steel.
But i am happy with the end result. The edges in this pic look a bit off but i have sanded and it is much more even.
p1010032ts7.jpg


I also added a wall jack to my room during this process. I now have my TV cable coming through a wall instead of dangling through a window. I also now have an ethernet line. No more wifi!
p1010047zh5.jpg
 
Here are some picks of the painted case.

Here it is with the top panel back on and most parts in.
p1010033uc5.jpg


You can see from these next two images that i did not pain the entire inside of the case in color. I did this on purpose as to not waste paint on the parts that would be covered.
p1010035rm2.jpg

p1010036xy9.jpg

In that one you can see and attempt at some cable management.

Here is the drive bay. I will only be using one of them as i have no need for the other.
p1010025ig3.jpg


Here are two more with the back panel back on and some more parts arranged.
p1010024rw8.jpg

p1010022dl8.jpg


Now onto more recent times. Here is were it stood today. It was on my floor out of view sucking in tons of dust.
p1010020ff0.jpg


But i got fed up and went out to IKEA today and got a nice little something for it to sit on.
Also cleaned and vacuumed out the room so there wont be some dust for a while.
p1010048am9.jpg


Here are a few of it fully assembled. Keep in mind i still need to finish the side window.
p1010043le3.jpg

p1010044ci0.jpg

p1010049zo4.jpg


Here is a temporary mess under the desk.
p1010054uq4.jpg


And the whole setup as it stand now.
p1010056fs2.jpg

And all powered up.
p1010058zs8.jpg


More to come soon.
 
Now you got some drawers to put junk into out of sight as well ;)

Looking good :)
 
Well actually in the background of some of the building shots you may see a desk. I think i cropped it out of most but it used to be mine. So there drawers will likely be full by the time i get all my stuff out of them.
 
looks nice, good work, i actually like the look of those cases, and the ultras versions.

Good work :cool:
 
Ok so i have been toying around with an idea for a little while now. I wanna run it by you guys for improvements suggestions or any other ideas.

Here are some pics of what the reverse side of the front bezel looks like.
p1010041ic2.jpg

p1010039ec2.jpg


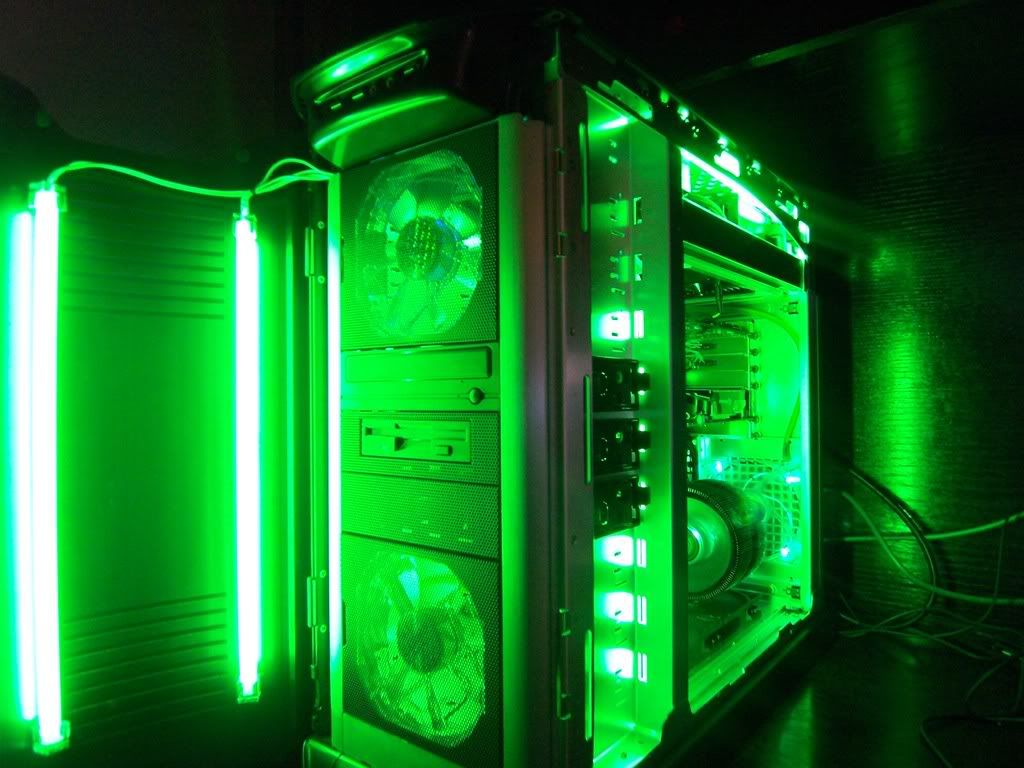
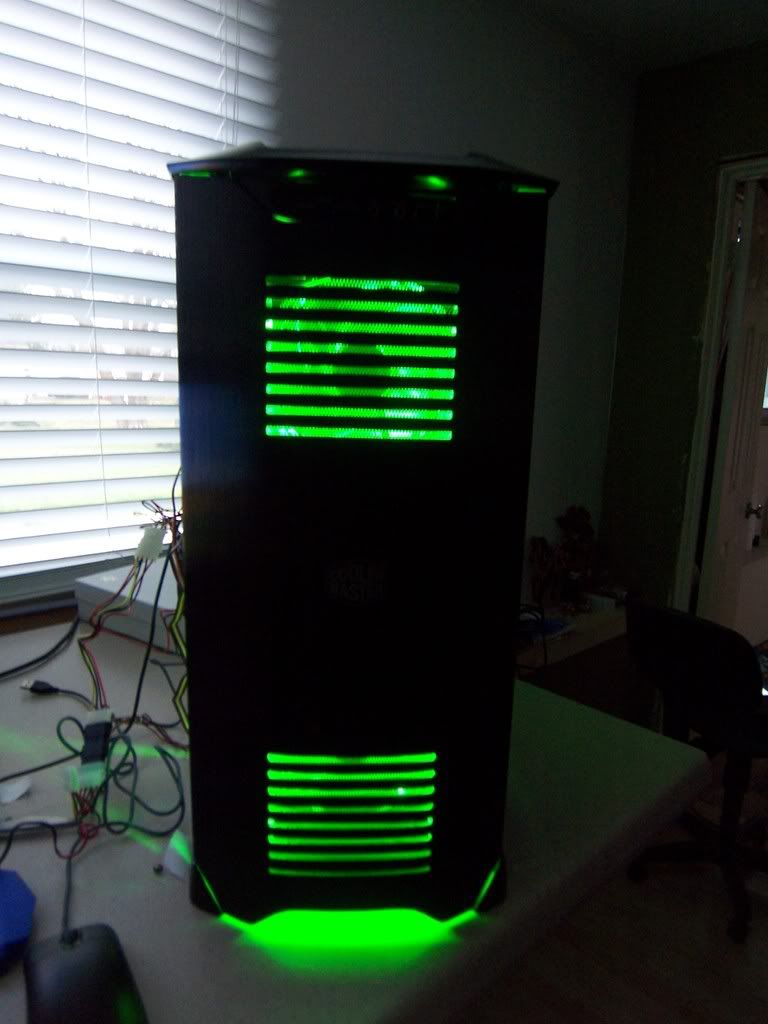
As you may or not be able to see it has several areas that vent out. What i want to do is add some LED's on the inside so that the light will show out from the front(through the vents). I did a test run with a strip of LED's i took out of an emergency exit sign. Ill have those up later. I think it will look good once i get some real LED's in there and put them where i want.

Any ideas?
 
I bought a set of meteror lights from directron. It's a strip of leds inside a cold cathode style tube. It has several different modes and can probably be easily removed from the tube if you just wanted to mount the bare boards with the leds.

I mean I have bags of led, and some very expensive hard to get leds (seriously) but I'd do it this way because it's easy, cheap, and will probably give the best results.
 
@WarlordOne: I took a loot at those and some other things they were selling. Sadly none seem to look like what i would need. They also only had 1 green option.

Im not sure if i mentioned but all lighting on this case will be in green. Dont know why but it seems hard to find green LED stuff in stores. All i seem to see are the UV, Blue and sometimes Red. I have worked with LED's before and the setup should be simple. I also have to order some fans from newegg.

Here are those concept shots i took using that LED strip.
Just to give an idea of what i am going for.
imgp14391ge3.jpg

imgp14441jq5.jpg
 
@WarlordOne: I took a loot at those and some other things they were selling. Sadly none seem to look like what i would need. They also only had 1 green option.

Im not sure if i mentioned but all lighting on this case will be in green. Dont know why but it seems hard to find green LED stuff in stores. All i seem to see are the UV, Blue and sometimes Red. I have worked with LED's before and the setup should be simple. I also have to order some fans from newegg.

Here are those concept shots i took using that LED strip.
Just to give an idea of what i am going for.
SNIP SNIP


Reminds me of my old rig...

intelrig047.jpg


intelrig037.jpg
 
Hmmm, i cant quite tell from the pic, but i can clearly see that you have some cathodes. But are your case fans LED lit, or just clear. If they are green LED fans what ones?
 
Hmmm, i cant quite tell from the pic, but i can clearly see that you have some cathodes. But are your case fans LED lit, or just clear. If they are green LED fans what ones?

I think that's just the cathodes from the front part of the case. You have to look through the green light to see the fans.
 
thats what i thought too, but if you look at the one to the rear of the case it looks illuminated
 
You know I didn't even think about the fact that you might want green leds. My answer: ebay. Look for either green led strip or green leds.

Just looking I came across plenty of green led strips pre resistored to take 12v.

I'm not trying to push Directron or anything since the meteor lights are the only things I've ever bought from them but in about 1 minute of looking I found all of this:

http://www.directron.com/ccflgreen.html
http://www.directron.com/lds24gn.html
http://www.directron.com/a1928.html
http://www.directron.com/cf120gn.html
http://www.directron.com/lt405gn.html
http://www.directron.com/ledlazergn.html
http://www.directron.com/lazerbeamgre.html
http://www.directron.com/4i.html

Also the UV lights are great because you can stuff your case with Green UV reactive parts and it'll glow. Anyway, I like what you've done so far and I think it'll look even better when you add some green light.
 
They are Zalman Green LED fans. These are by far my favorite fans ever, I still have them if you want them.
 
@JDM Thanks for the info and the offer but i would prefer to buy newer ones. Only cause fans do have a shelf life, the ones i have are currently going to hell, so i am really in the market for new one, thanks anyway.

@Warlord. Thanks for the post, i saw all those and didnt see anything that would do the job i need. But there was a nice pick of one of the fans i was looking into but didnt get to see lit up. Thanks again for the info.
 
So, between school, work new ISP/Cable provider and a whole slew of other things that ive had to do over the past few months, id like to think i can finally bring this project to a close fairly soon.

New Plans:
-I had a class in school this past semester where i learned a little bit more about illustrator. So i scrapped my old cut diagram for the side window, working a new one one with more detail and precision.
-I still plan to do some work with the LED's and get the glow effect i want.
-My dads old desktop died, and he decided to go Mac, so i inherited a case with some spare parts i plan to add onto my case. Most importantly being a frontside audio/usb port that im gonna incorporate into a bay cover behind the case door.
 
Back
Top