Custom Built Cabinet

Shadowarez

Gawd
Joined
Jul 8, 2019
Messages
909
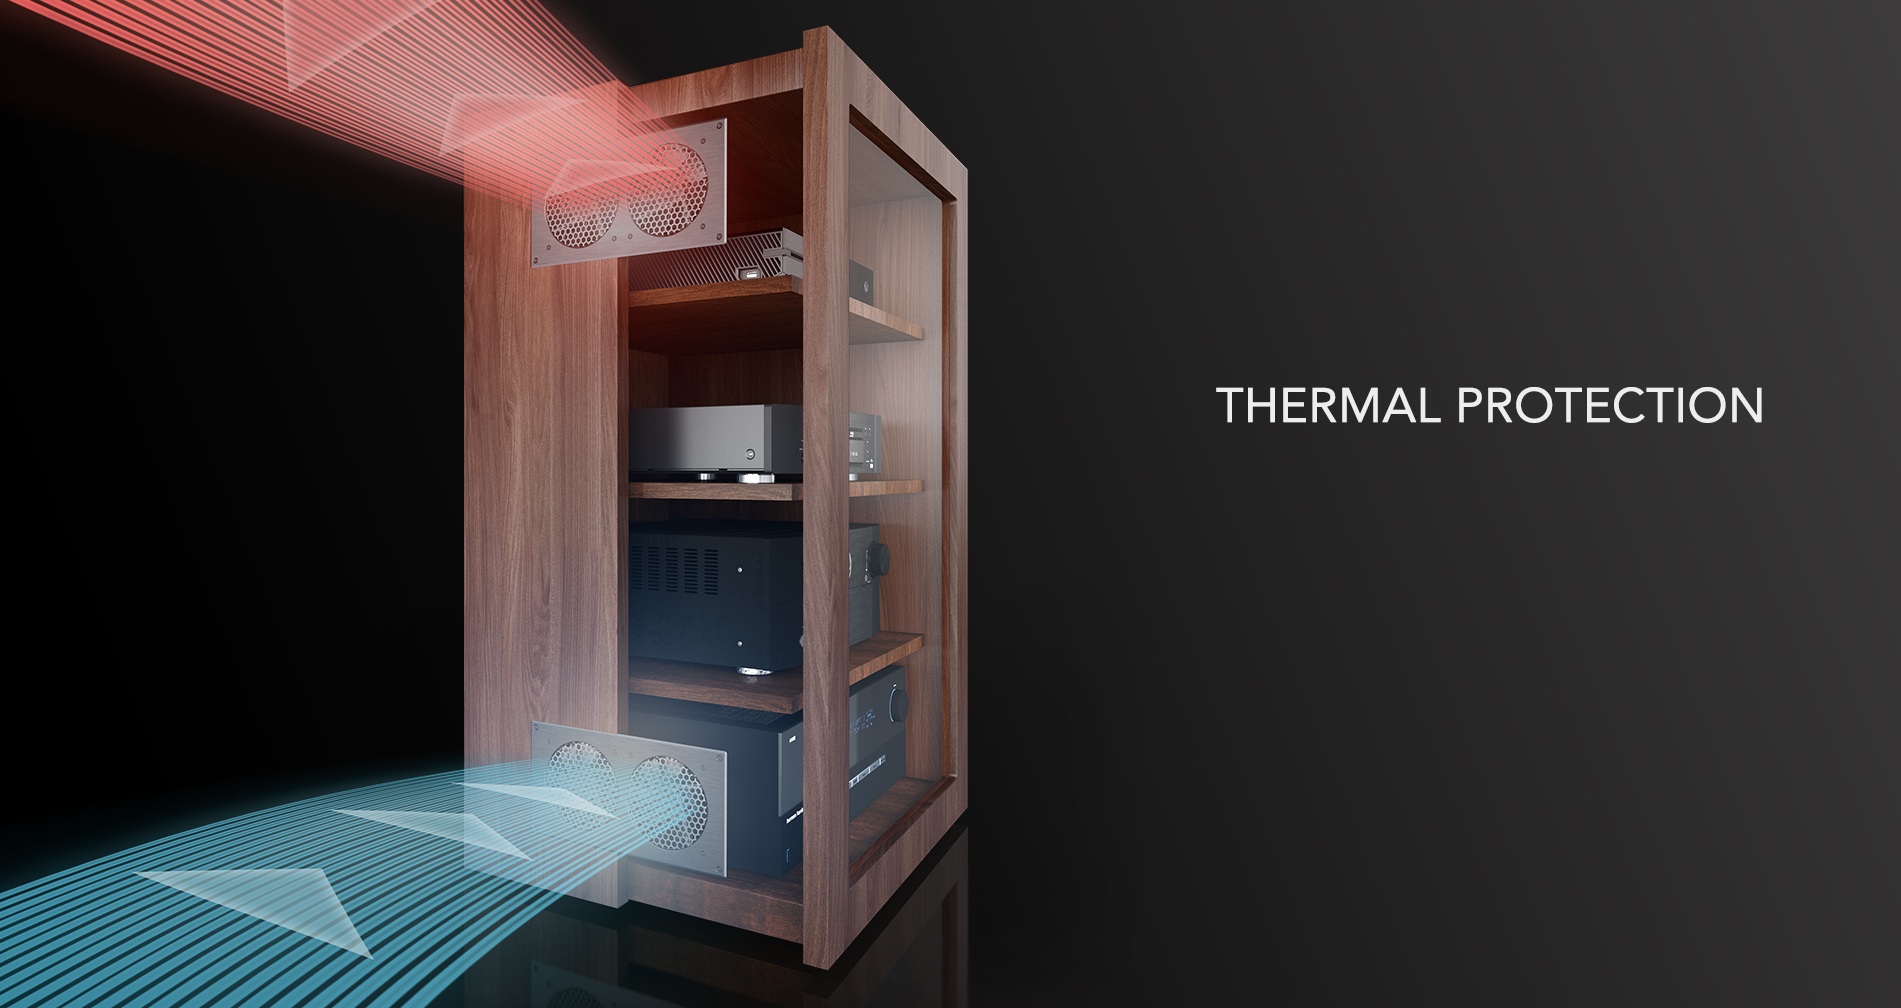
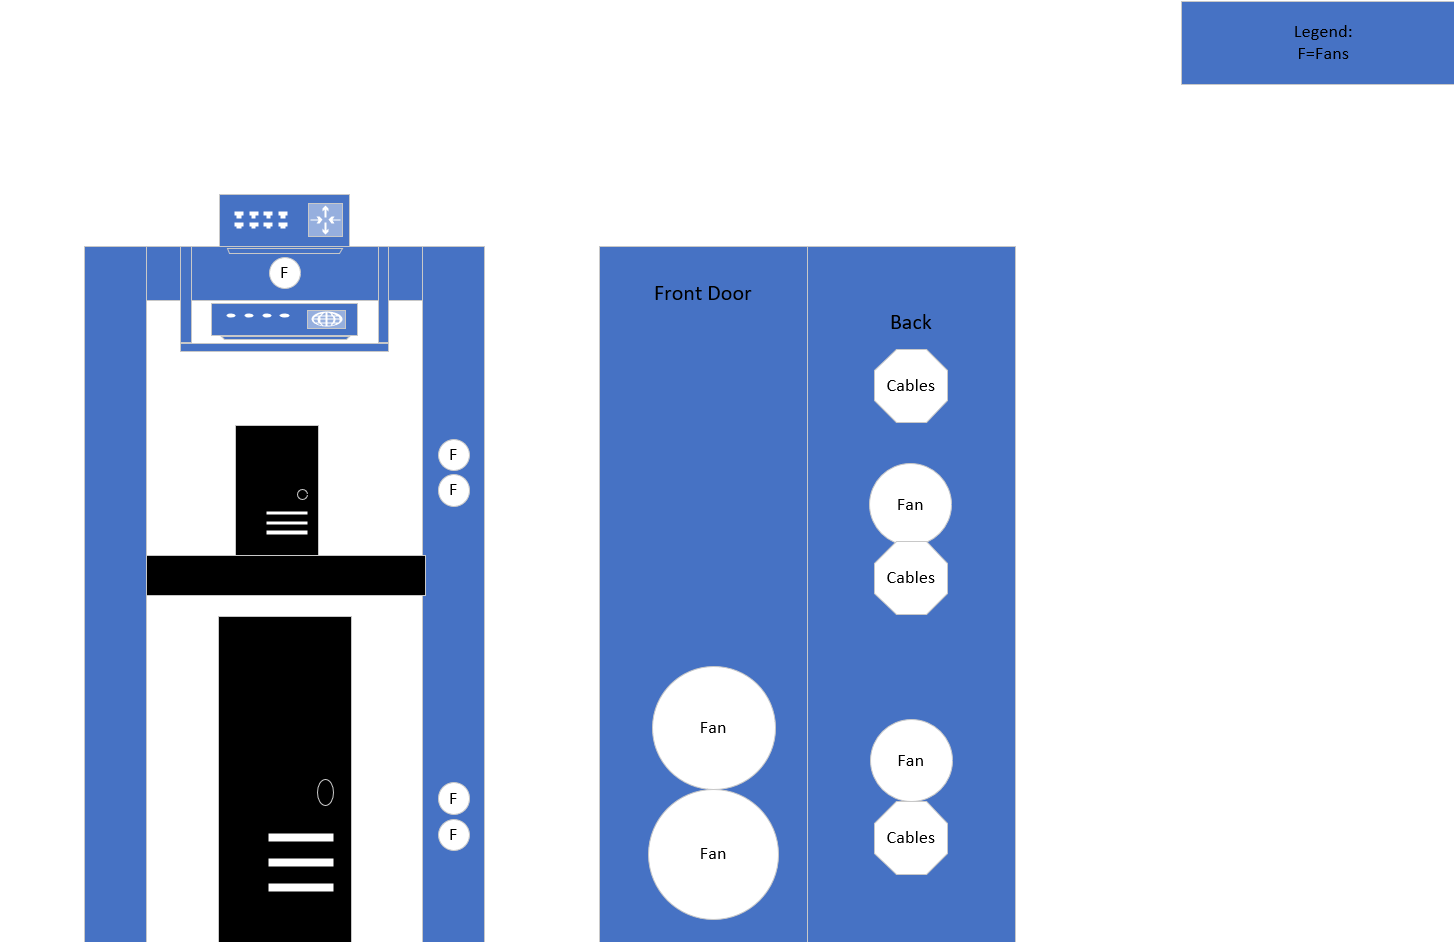
hey all im looking around for a Cabinet / rack but nothing quite suites my idea of how i want this thing cooled. heres what iv whipped up could use some pointers as this will be 100% custom built.
 

Attachments

  • Cab.jpg
    Cab.jpg
    573.4 KB · Views: 0
  • BP2.png
    BP2.png
    70.4 KB · Views: 0
  • Front BP.png
    Front BP.png
    49.3 KB · Views: 0
  • Cab 2.jpg
    Cab 2.jpg
    659.7 KB · Views: 0
  • Fans.jpg
    Fans.jpg
    27.9 KB · Views: 0
my suggestion is to hire a custom cabinet manufacturer to make you what you want.

If you're trying to be cheap about it, it will look like crap.

Alternatively lots of carpenters are capable of doing things similar to this.

If cheap is what you want, buy some 2x4s, plywood, glass, and screw it together. Then paint it white so your wife will allow it in the house.

As far as the design goes, cabinets are heat traps, so if you really need it in another enclosed space, you can always add more fans.
 
Last edited:
If cheap is what you want, buy some 2x4s, plywood, glass, and screw it together.

Plywood isn't necessarily cheap, and a good baltic birch with edge banding applied can look every bit as nice as a $olid wood unit. If it was me I'd spend the money on a nice table saw and make it myself, but that's only because it would be a good excuse to justify buying a table saw.
 
Plywood isn't necessarily cheap, and a good baltic birch with edge banding applied can look every bit as nice as a $olid wood unit. If it was me I'd spend the money on a nice table saw and make it myself, but that's only because it would be a good excuse to justify buying a table saw.
Didn't say plywood was cheap. What do you think the cabinet maker would use? Just outlined the basic process for making a cabinet in DIY style. Also, plywood is solid wood. Its MDF and particle boards that are not solid wood.

I love making stuff out of plywood, but for the edges I kinda prefer the layered look vs edge banding. My point was more to, doing it yourself to save money (the labour is the big savings) will look cheap, hire a pro if you want pro results, otherwise, buy this list of things and get to it. The only bit I left out was; please take pictures!
 
Thank you for all the advice this far I was bout to ask about types of wood that would make this at least sturdy. It doesn't have to look pro but so long as it's functional. I like the idea on buying a saw and doing this myself as love this kinda work but I got a bro inlaw who is a carpenter by trade so it'll be at least uniform.

As for fans I was hoping to use 120's as the ones provided with the bracket are actually not too bad a price.

I'd prefer 140 as it would give more air flow bit the brackets needed aren't available unless they are easily 3D printed.
 
I'd prefer 140 as it would give more air flow bit the brackets needed aren't available unless they are easily 3D printed.
Just a thought, if you're building the entire thing from solid wood, you don't need a bracket for the fans. Just use a router and a hole jig (check Amazon and you'll understand what it is) then put a chamfer on the hole with your router, then just screw the fans to the wood with wood screws.
Check ponoko.com, you can get laser cut acrylic or metal at Hobby qtys and decent pricing, you can have a bracket any bloody size you want. I would avoid 3d printing, it takes a long time and the quality just isn't there. You can do some cool things, but profile cutting plate and sheet is still the best way to do most things.
I would also check around on the internet, I would think you want enough air flow to completely change the air in the box every hour or maybe less. With a large cabinet that might get tough with teensy little 120mm fans.
 
Reading comprehension is a thing.

Building a cheap cabinet means doing it yourself. At no point did I claim the materials were cheap, only the end result could be if you forgo paying a pro to build you a custom cabinet.

I'm sorry all this went over your head, but hey keep quoting shit out of context.

Or maybe the OP should just make it out of cardboard, Popsicle sticks, and cling wrap.
 
Last edited:
hmmm if i was at the old job that might have been the only option lol, but im finally in a position to make this properly, as for appearance i understand what ya meant i want this to be symmetrical and fit together nicely as it will be the home of the Main Nas,Backup Nas, and Modem,

so it will have to be done right it should be as air tight as possible so no glass, even thinking of adding ducting to the back of the Main Nas (Silverstone DS308) so it exhausts out the back of this properly, its one of my biggest projects as iv went from Jank to semi decent hardware,

first was a Qnap TS469 Pro (backup) i added more memory to it ditched the usb 2 DOM it is now running Unraid and surprisingly it sees all 4gb of ram not just 3 like it did in the Qnap Os. that nas has 24TB of storage and is for wife so her data is backed up onsite and offsite incase anything happens to any data.
 
so it will have to be done right it should be as air tight as possible so no glass,
Chat with your brother in-law, glass isn't much harder, you just buy it cut to size and then make slots in the wood to retain it. Seal it up with silicone. Do what you want, but don't be intimidated by glass.
even thinking of adding ducting to the back of the Main Nas (Silverstone DS308) so it exhausts out the back of this properly, its one of my biggest projects as iv went from Jank to semi decent hardware,.
Air flow is going to be your biggest challenge. Heat and airflow is a complex topic.
 
yeah i was playing around with a 3D simulator at friends place to test air flow im thinking i may leave the shell off the main nas so air flow is flowing from both sides and out heat may build up but should be exhausted pretty quickly. once i get this cut and ready to assemble ill have to put up pics and will do thermal testing the case i chose is known to be a hot box so hoping this tames it as it will be biggest upgrade to my Storage network and should last quite awhile.
 
yeah i was playing around with a 3D simulator at friends place to test air flow im thinking i may leave the shell off the main nas so air flow is flowing from both sides and out heat may build up but should be exhausted pretty quickly. once i get this cut and ready to assemble ill have to put up pics and will do thermal testing the case i chose is known to be a hot box so hoping this tames it as it will be biggest upgrade to my Storage network and should last quite awhile.
i'm not sure i'm following your logic here;
Putting a hot box inside another hot box will just make thermals worse. You are putting all these items inside a cabinet for an aesthetic reason right?
On fan sizing, you need to understand that as the case/box/cabinet gets bigger, the fans need to get bigger as well. you need to exchange the air within to introduce "cooler air". So a small computer case with a 120mm, this works. That same 120mm fan in a larger cabinet, does basically nothing, as it takes too long to exchange the air in the cabinet, and the air inside heats up.

Biggest thing you must understand is that by putting all of these heat generating appliances inside another cabinet, will absolutely make your thermals worse, and unless you're adding an AC unit, everything will run hotter because of this. No matter how many fans you add.
 
i was hoping to keep it pretty tight with some space around all sides of the main comp, the nas up top and the modem, the main reason is to keep everything close by the router so dont need to run cables across the room. the 2 140m fans on the side intake air for the main system and the 2 140m fans on the front intake as well right infront of the pc. then a 140 in the back to exhaust the air. i understand the issue what i hoped tin accomplishing is having enough airflow to keep it cool and quite.

im trying to centralize everything into one area mainly i know racks are a option but feel i can make it at least a lil more functional.
 
  • Like
Reactions: travm
like this
I would slat your shelves (if you want to be fancy) or use cut-down milk crates as your shelf and use a nice wood brace and edge to hold the milk crate in place.
 
was thinking of making a nice sunken area for the board in middle to slide in and be nice and flush after this is built the main issue is figuring out the power delivery for the backplane on this case and the fact it only has 4 sata ports no were in the documentation does it say if need to connect all 4 sata power ports and molex and if i need to use 4 sas and 4 sata to see if the drives all show up. that will be fun when it comes to testing see what works.
 
Back
Top