Supercharged_Z06
2[H]4U
- Joined
- Nov 13, 2006
- Messages
- 3,475
I've been printing a good bit of ABS lately... But on the larger print jobs, was getting frustrated as I was getting some lifting/warping on my prints... even with the heated bed. That and the smell wasn't all that great either... Just the nature of the beast with ABS.
So, I finally broke down and decided to build an enclosure for my Prusa i3 MK2S. Problem now solved and it's a LOT quieter... Not that the Prusa is a loud machine to begin with, but it's now REALLY quiet - so much so I often can't tell its printing. Plus, no more ABS fume smell either!
It's still somewhat of a work in progress, but most of the heavy lifting is done. Decided to go the Ikea Lack table route. Finished the LED lighting, isolation feet, HEPA filtration duct//fan shroud assembly and the basics as to the enclosure hardware itself:
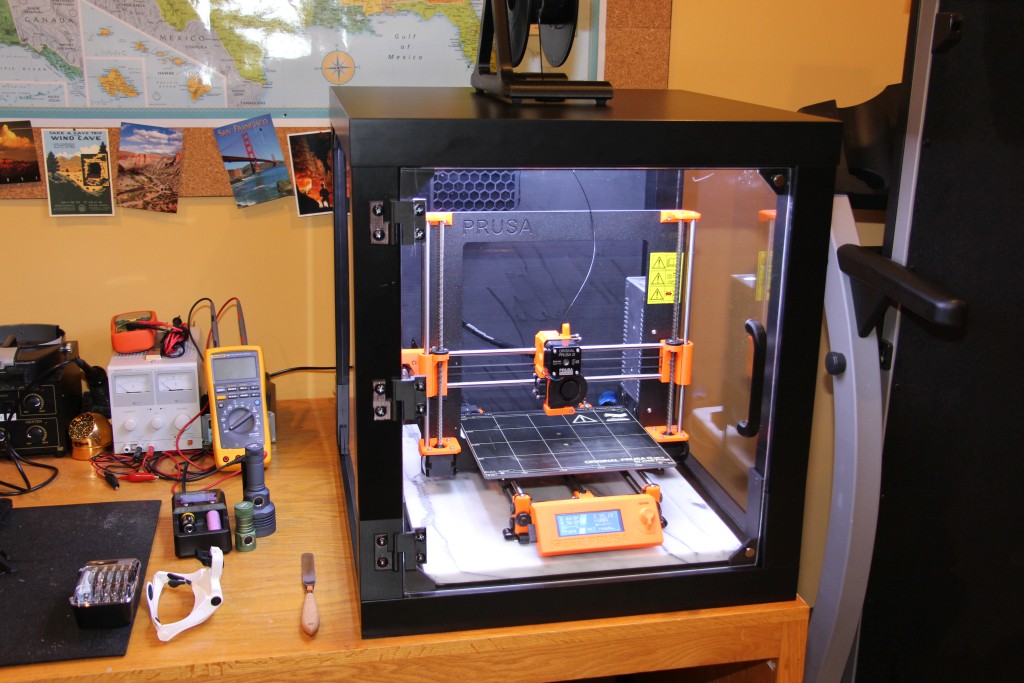
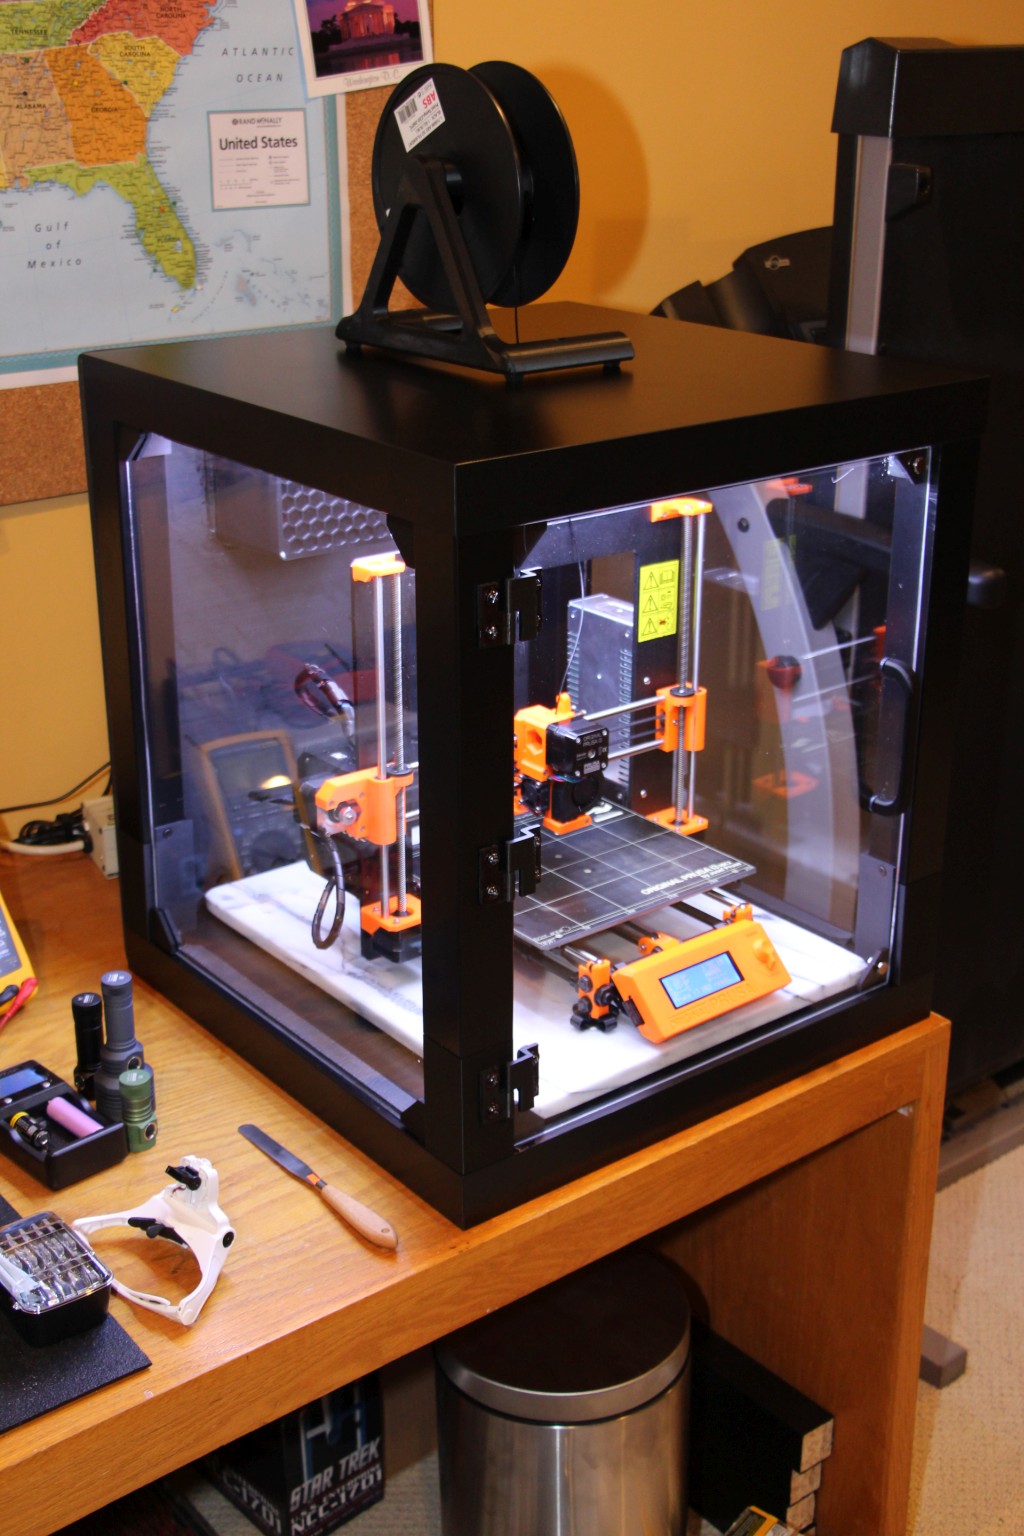
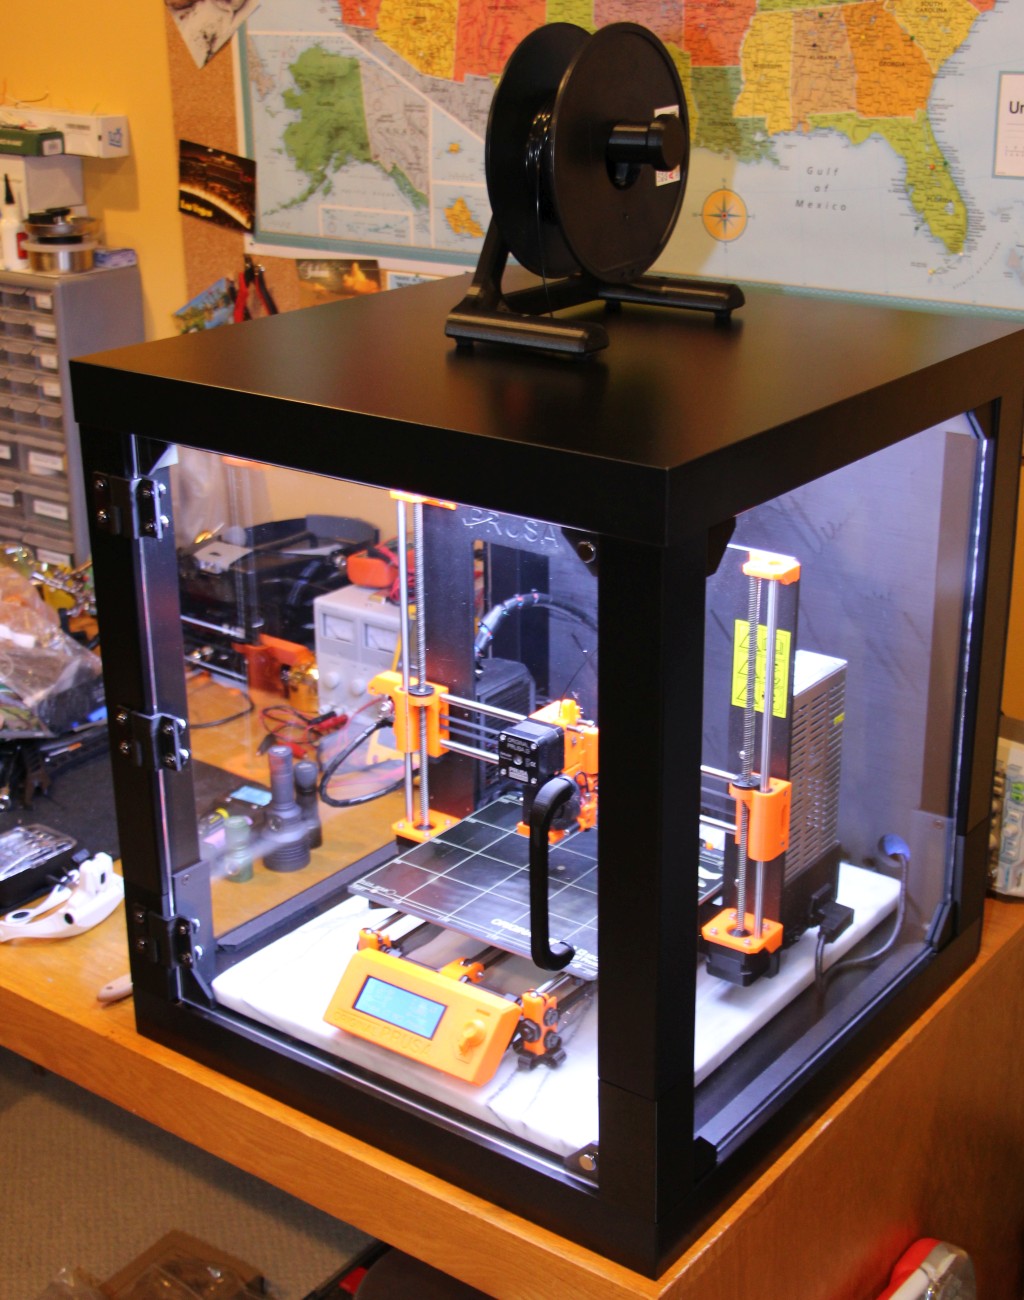
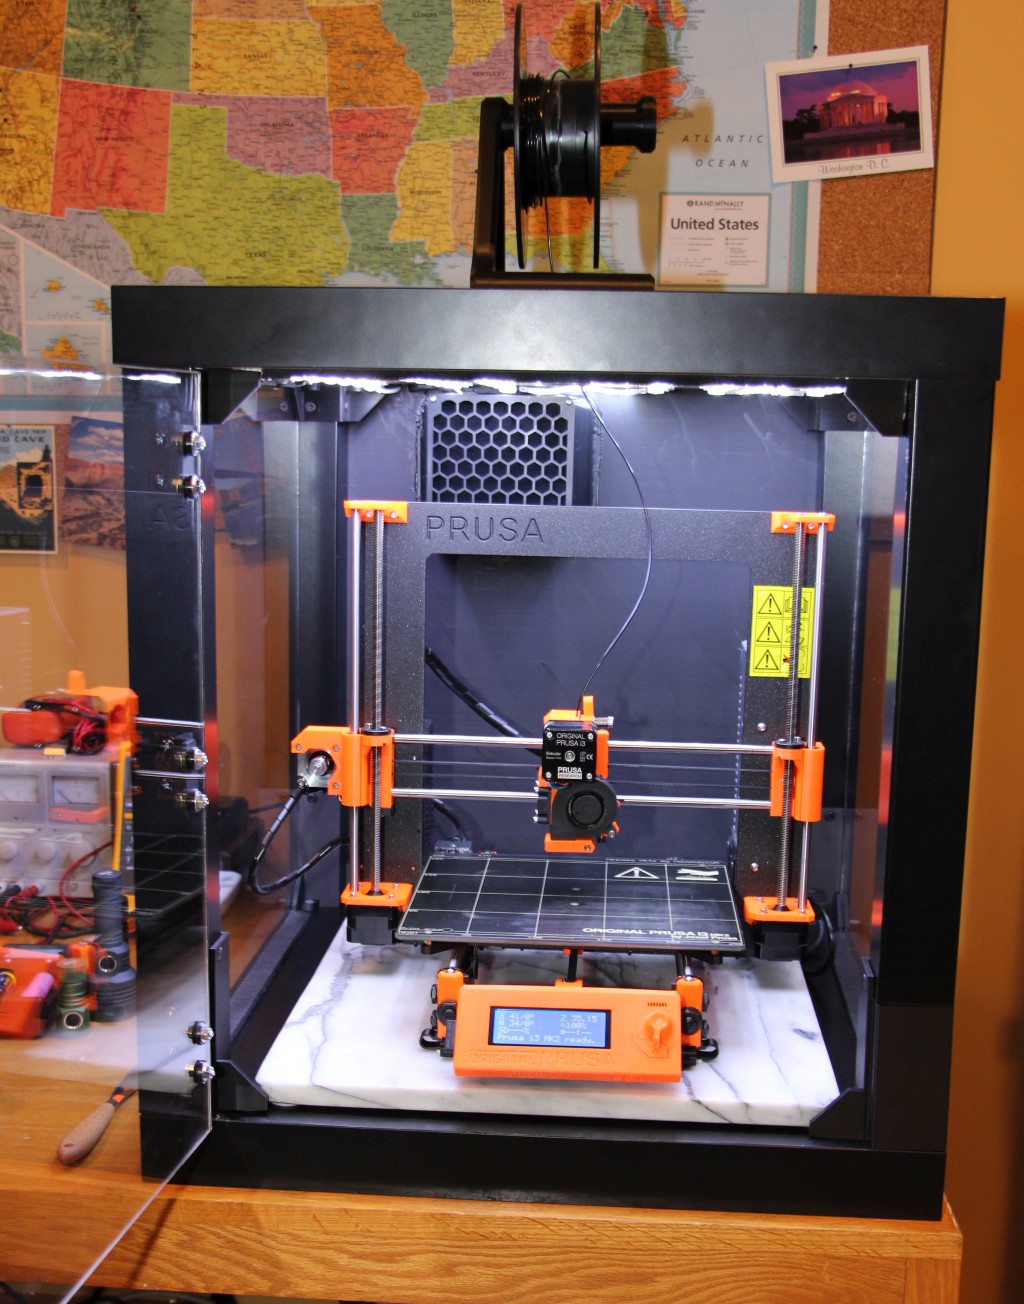
Except for the Ikea Lack tables, the marble slab, the nuts/bolts/screws and the plexiglass, all of the fittings/hinges, fan/filter shrouds, case accessories, etc. are all 3D printed by the Prusa.
Still left to do: Internal Pi camera mount, Pi case to mount a Pi 3 on the back (for Octoprint), power switches and temperature indicator panel on the front top (just inside door), temperature control circuitry for the fan, and a lighting control circuit - also going to have the Pi wired in to control everything.
If any of you are interested in doing something similar, there are lots of example projects out there. Here's the project that got me started on this: https://www.thingiverse.com/thing:2012384
This is the Ikea Lack table it is built from (2x): http://www.ikea.com/us/en/catalog/products/80104268/
I decided to not use the lower legs - just use it as a box. It's a bit more sturdy that way, plus I had the desk space for it. (Can always easily add the lower legs if I so choose.)
Here are a few other links that I used in building this:
https://www.thingiverse.com/thing:1814763
https://www.thingiverse.com/thing:2105113
https://www.thingiverse.com/thing:1707045
https://www.thingiverse.com/thing:2291409
https://www.thingiverse.com/thing:2704291
https://www.thingiverse.com/thing:2306231
https://www.thingiverse.com/thing:2458298
All in, I've spent a little over $100 in building it. (Minus the LED lighting, switches, and the Pi that's going in). The most expensive parts so far were the three sheets of plexiglass @ $23 a pop. I went with thicker 5mm panels: https://www.lowes.com/pd/OPTIX-0-22-in-x-18-in-x-24-in-Clear-Acrylic-Sheet/3502292
Was a fun little project - still have a bit of tinkering to do, but I'm very happy with how it has turned out so far.
So, I finally broke down and decided to build an enclosure for my Prusa i3 MK2S. Problem now solved and it's a LOT quieter... Not that the Prusa is a loud machine to begin with, but it's now REALLY quiet - so much so I often can't tell its printing. Plus, no more ABS fume smell either!
It's still somewhat of a work in progress, but most of the heavy lifting is done. Decided to go the Ikea Lack table route. Finished the LED lighting, isolation feet, HEPA filtration duct//fan shroud assembly and the basics as to the enclosure hardware itself:


Except for the Ikea Lack tables, the marble slab, the nuts/bolts/screws and the plexiglass, all of the fittings/hinges, fan/filter shrouds, case accessories, etc. are all 3D printed by the Prusa.
Still left to do: Internal Pi camera mount, Pi case to mount a Pi 3 on the back (for Octoprint), power switches and temperature indicator panel on the front top (just inside door), temperature control circuitry for the fan, and a lighting control circuit - also going to have the Pi wired in to control everything.
If any of you are interested in doing something similar, there are lots of example projects out there. Here's the project that got me started on this: https://www.thingiverse.com/thing:2012384
This is the Ikea Lack table it is built from (2x): http://www.ikea.com/us/en/catalog/products/80104268/
I decided to not use the lower legs - just use it as a box. It's a bit more sturdy that way, plus I had the desk space for it. (Can always easily add the lower legs if I so choose.)
Here are a few other links that I used in building this:
https://www.thingiverse.com/thing:1814763
https://www.thingiverse.com/thing:2105113
https://www.thingiverse.com/thing:1707045
https://www.thingiverse.com/thing:2291409
https://www.thingiverse.com/thing:2704291
https://www.thingiverse.com/thing:2306231
https://www.thingiverse.com/thing:2458298
All in, I've spent a little over $100 in building it. (Minus the LED lighting, switches, and the Pi that's going in). The most expensive parts so far were the three sheets of plexiglass @ $23 a pop. I went with thicker 5mm panels: https://www.lowes.com/pd/OPTIX-0-22-in-x-18-in-x-24-in-Clear-Acrylic-Sheet/3502292
Was a fun little project - still have a bit of tinkering to do, but I'm very happy with how it has turned out so far.
![[H]ard|Forum](/styles/hardforum/xenforo/logo_dark.png)
