Looking for spacers from alternative material

notarat

2[H]4U
Joined
Mar 28, 2010
Messages
2,500
I have a Creality CR6 Max and I removed the bed to add insulation. Noticed that the spacers were deformed, either from being screwed down too tightly or from heat cycling. Or both.

I would like to find spacers using an alternative material to prevent deformation.

Any suggestions? McMaster Carr has some different materials but $4 per spacer is robbery
 
Spacers? Are you talking about these 16mm silicone bed mounts?

https://www.amazon.com/dp/B092VFWGDM/
Those are similar to the ones for the CR-6 Max but I want a different material. The ones it came with are deformed after less than 2 months of use so I am thinking of using stiffer/more heat resistant material like ceramic or aluminum.
 
As an Amazon Associate, HardForum may earn from qualifying purchases.
Those are similar to the ones for the CR-6 Max but I want a different material. The ones it came with are deformed after less than 2 months of use so I am thinking of using stiffer/more heat resistant material like ceramic or aluminum.
I hard mounted my cr-10 bed with aluminum spacers and fiber washers on the ends. I just recently replaced by bed due to warping. Mine is back on springs again. It was an aliexpress sourced bed so there is that but just wanted to share my tidbit with ya. All mine are back on springs again. Lotta variables i know but replacing that is a pita that id rather not risk again haha.
 
I'd just use the same kind. just don't smash them. If you need to smash them to get your bed level then you need to readjust the bed. If you can't get it level without smashing then time to print out an adjustible z-level if you're printer doesn't have one.
 
I'd just use the same kind. just don't smash them. If you need to smash them to get your bed level then you need to readjust the bed. If you can't get it level without smashing then time to print out an adjustible z-level if you're printer doesn't have one.

I understand what you're saying but you assume the reason they're deformed is solely because they were smashed down during assembly at the factory. That may be true, but it could also be due to heat cycling in addition to being overtightened when it was built. In that case using the same material doesn't eliminate the issue.

The bed is not "level adjustable" like other printers (with level adjusting screws like a replicator or a FF Creator or a CR-10S or a CR-10 S4/5). It's bolted directly to the carriage with these spacers and the print head auto levels using a strain gauge to create a mesh.

I think I'm going to get something like:

https://www.amazon.com/uxcell-Lengt...9261c&pd_rd_wg=cAhPk&pd_rd_i=B07Z9BHSY8&psc=1

Then cut them to length...all 25 of them, lol...Time to break out my pipe cutter.
 
As an Amazon Associate, HardForum may earn from qualifying purchases.
notarat Ah i was not aware, apologies. Figured the bed style was the same they have been using for ages it seems haha.

Another idea is what about printing some? Polycarbonate with carbon fiber prints quite easily and holds up pretty well. Pricey for a roll but I am sure you could find some other uses for it as well.
 
I don't think there would be a bunch of heat cycles on a new printer. aluminum/brass tubes will work.. I actually ended up warping the abs part of the aluminum mount eventually. (the reason I switched to silicone ones) I've used the abs wrapped aluminum solid mounts from th3d and silicone ones. Suppose could also be differences in quality/density in silicone from different manufacturers. Also if your adding insulation, you will need to cut space around the holes to allow tubes to sit level.

One thing to check also.. when you take out the silicone mounts.. see if they're all the the same size. You can get them with one shorter then the others to accomidate for the heatbed bracing. Possibly an issue if the others have no problem leveling without squishing.
 
notarat Ah i was not aware, apologies. Figured the bed style was the same they have been using for ages it seems haha.

Another idea is what about printing some? Polycarbonate with carbon fiber prints quite easily and holds up pretty well. Pricey for a roll but I am sure you could find some other uses for it as well.
No worries! It's a different kind of printer than what I am used to so it stands to reason not everyone knows about it's peculiarities yet... :)

I could probably print some in ABS on one of my FlashForge Creators and I think it would probably work since ABS likes a ~100°C heated bed and the 6Max will never see that high of a bed temp but I kind of like the idea of brass or copper so there's no chance whatsoever of there being a repeat of the squashed spacers.
 
I don't think there would be a bunch of heat cycles on a new printer. aluminum/brass tubes will work.. I actually ended up warping the abs part of the aluminum mount eventually. (the reason I switched to silicone ones) I've used the abs wrapped aluminum solid mounts from th3d and silicone ones. Suppose could also be differences in quality/density in silicone from different manufacturers. Also if your adding insulation, you will need to cut space around the holes to allow tubes to sit level.

One thing to check also.. when you take out the silicone mounts.. see if they're all the the same size. You can get them with one shorter then the others to accomidate for the heatbed bracing. Possibly an issue if the others have no problem leveling without squishing.

I already have at least 100 print cycles on it since I have been backlogged on stuff I wanted to do, and have already accumulated 296+hrs of print time in just a few weeks.

What I noticed while I was removing the bed to install the insulation was that the "squashing" effect on the spacers seemed to be a little more pronounced the closer to the heating element the spacer was located. That was what pointed me in the direction that it may not be just "overtightening" of the spacers causing the issue...

I have reassembled it for now to test the performance after applying insulation (and it's measurably better) but I plan to disassemble it Thursday to prep for arrival of the tubing (hopefully on Friday)

I think with the metal tubing I'll be able to customize the length so that I can "level" the bed a bit more evenly by adjusting the length of tubing I cut to make the spacers. That will allow me to eliminate the pesky low spot that runs from the right, front of the print bed along the whole length of the bed to the right rear of the bed. It was like that whole side was "off" .5mm more than the rest of the bed.

I'll use the OEM build plate that came with my Replicator 2 (covered in sand paper to lap heat sinks and the like) to adjust the length of the tubing...that should allow me to fine tune it a bit I think.
 
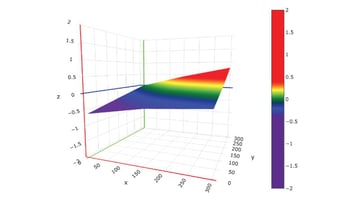
Once you get the parts.. if you use Octoprint there is a plugin called bed visualizer that makes fine tuning a lot easier.

al-illustr-lucas-carolo-via-all3dp-210419_download.jpg
 
Once you get the parts.. if you use Octoprint there is a plugin called bed visualizer that makes fine tuning a lot easier.

View attachment 417160
I used Octoprint several years ago with my MP Select Mini but stopped using it when I sold the mini to my friend to get him hooked on 3dprinting (Which worked wonderfully...btw. LOL)

I have a couple Raspberry Pi units I could use for something like that. One thing I noticed with my 6Max is that while the screen displays 16 points of data while Auto Leveling, the process itself checks 49 different points (The display of which would be far more accurate)
 
Back
Top